PlayPen Tutorial
This tutorial guides you through the PlayPen, an interactive tool which lets
you explore how the various aspects of a gemstone design affect its performance.
The PlayPen provides a user-friendly interface to Gemray. You do not need to
know or understand GemRay, GemCad or Optimization to operate and benefit from
the PlayPen. For many users, it may be the first and only part of BOG that they
use.
The PlayPen lets you see raytraces of a gemstone while interactively:
- adjusting pavillion and crown angles
- varying refractive index and dispersion
- changing tilt angle and direction
The PlayPen also lets you store the current results for direct comparison with
a different combination of angles, refractive indices, gem materials, etc.,
or even with a different file.
The PlayPen has three modes of raytracing: Normal,
Tilt Performance, and Colour
Raytrace . Normal Mode produces a "standard"
raytrace of the gem for the current set of parameters. In Tilt
Performance Mode, the PlayPen will evaluate and plot the brightness of
the gem over a range of tilt angles. Finally, the Colour
Raytrace mode uses the gem material colour and the dispersion to produce
a full-colour facsimile of the gem's appearance.
Before You Begin
This tutorial assumes that you have just completed the Quick
Start tutorial and are still running the BOG program. Don't worry if this
is not the case. Just read and follow the instructions in the box below.
|
If you aren't continuing from the Quick Start
tutorial, please read and follow the instructions in this box.
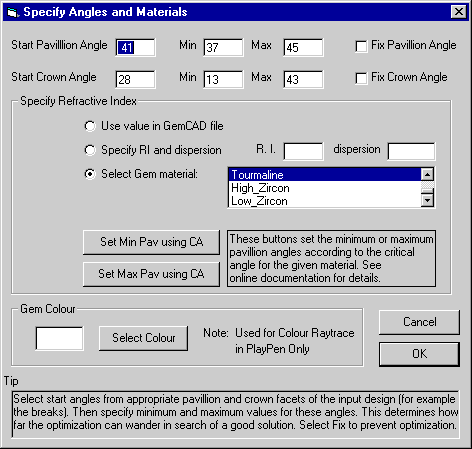
1. Click Select .GEM File in the main BOG
window. Choose the file called BOGTUT.GEM and click Extract
Angles. Choose the 41 degree pavillion angle and the 28 degree
crown angle from the lists then click Ok.
2. Then click the Modify Values button in
the panel labelled "Set Optimization Angles and Gem Material"
panel. Enter the angles as shown below.
3. Under "Specify Refractive Index," choose the
Select Gem Material option and choose Tourmaline from the scrolling
list. You have now told BOG which file, angles, and gem material to use
in the PlayPen. Click Ok to return to the
main window
The Story So Far...
This PlayPen tutorial will refer to the angles derived by BOG during optimization
in the Quick Start tutorial. In particular,
BOG settled on a much flatter crown, with 19 degree mains, as opposed
to the 28 degree mains of the input file. This was based on optimizing
the ISO brightness only. Changing the design increased the face-up ISO
brighntess by 2% from 93.9% to 95.9%. We will use the PlayPen to try to
understand why this may not be the best choice.
|
Enter the PlayPen
From the main BOG window, click the PlayPen button
to begin. The PlayPen window should appear. Take a moment to familiarize yourself
with the layout of the various sub-panels.
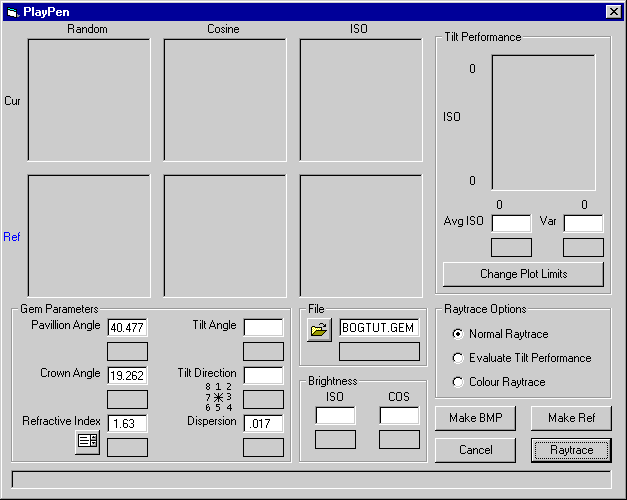
The PlayPen window is dominated by six image boxes, which will contain the
raytraced output of Gemray. From left to right, these will be the Random,
Cosine, and ISO raytraces.
The random raytrace shows the gem design under random lighting conditions and
most closely approximates the real-world appearance of the stone. The cosine
raytrace shows the gem's response to lighting conditions that are brightest
directly above the stone, and the ISO image portrays the stone under uniform
lighting. The gemray manual contains a complete description of the various lighting
models, and further information appears here.
The upper three boxes, labelled Cur, refer to the
current gem configuration. The lower three boxes, labelled Ref
will contain the stored raytraces of the Reference design (more on using the
Reference later in this tutorial).
To the right of the raytrace images lies the Tilt Performance
panel. This will contain graphics and text clarifying the brightness variation
of the gem with tilt angle (more on this later in the tutorial).
The Gem Parameters panel is directly below the
raytrace windows. This panel contains six boxes allowing interactive entry of
the current gem configuration. If you just completed the QuickStart tutorial,
the optimized angles should already be entered for you. If not, please type
in the values shown above. Note that each text box has a rectangle directly
below it. Like the raytrace windows, these lower boxes are used to store values
for the Reference gem. The small Gem Materials
button (with the list symbol, next to the Refractive Index entries) allows you
to select gem materials (i.e. refractive index and dispersion) and stone colour
from a window.
To the right of the Gem Parameters panel is a small panel listing the current
File being examined and, if appropriate, the filename
of the Reference gem. The small button with a folder icon lets you load a different
file for comparison. Note, however, that changing the file here does not change
the file being optimized (the one shown in the main BOG window).
Below the file panel is another small panel which shows the ISO and COS Brightness
of the Current and Reference gems.
The Raytrace Options panel shows the current mode.
We will try all three modes during the course of this tutorial.
The main command buttons are located below the Raytrace
Options panel. Raytrace initiates the Gemray
calculations for the current gem parameters and mode. Cancel
aborts the PlayPen and returns you to the main BOG window. The Make
BMP button creates Windows Bitmap (.BMP) files of the current gem raytraces.
You can use standard image editing programs to view and manipulate these images,
and they can be included in other documents such as Microsoft Word files and
web pages. Finally, the Make Ref button stores
the current parameters and output for comparison. We will be using Make Ref
several times in this tutorial.
Time to Play!
Click the Raytrace button. The DOS window should
show Gemray busily calculating, and soon, three images of the raytraced gem
should appear. Note also that the PlayPen reports the ISO and COS values in
the Brightness panel.
Store the current gem as the Reference. Click the Make
Ref button. Notice that identical copies of all the relevant images and
values have been copied to the Reference boxes below each item. Reference values
appear in blue text for easier identification.
Try tilting the stone. Enter 30 degrees in the Tilt Angle
box and 1 in the Tilt Direction box. Click Raytrace
again. Now, the upper images show the gem tilted 30 degrees toward the 12 o'clock
direction. Note the reduced ISO and COS values in the Brightness
panel.
Let's try the design in diamond! Enter the refractive index for diamond (2.42)
into the Gem Parameters panel (ignore the dispersion
for now). Alternatively, click the Gem Material
button (next to the Refractive Index box) and select
Diamond from the list of materials. Click Raytrace
again. Because of added internal reflections and trapped rays, the calculations
will probably take somewhat longer. Even without optimization, the higher refractive
index of diamond gives it excellent tilt performance. Too bad that it is pretty
expensive and hard to polish. Re-enter the refractive index and dispersion values
for tourmaline (1.63, 0.017) before proceeding.
Tilt !
Our optimized gem has excellent face-up brightness, but relatively poor performance
when tilted 30 degrees - the ISO brightness drops from 96% to 56%. Select the
Evaluate Tilt Performance option in the Raytrace
Options panel. The Tilt Angle and Direction should still be 30 degrees
in direction 1. Once again, click Raytrace and
watch what happens. The program raytraces the gem for three orientations: zero,
fifteen, and thirty degrees in the 12 o'clock direction. In general, this will
always be inclinations of zero, half the Tilt Angle
, and the full Tilt Angle. In the Tilt
Performance panel, a plot appears showing the ISO brightness at each
angle. Click the Change Plot Limits button if you
want to zoom in on the trace.

Below the plot, the program reports the average and variation of the ISO brightness.
The Avg ISO value is simply the numerical average
of the ISO brightness at the three angles. The Var
number is the average of the difference between each brightness value and the
Avg ISO value. A gem showing no variation in brightness
with tilt will have Var=0. In this example, we
see that the variation of brightness with tilt is almost 14% on average. More
information on tilt calculations appears here.
A Comparison
Have we really improved the gem? Recall that running the optimizer based on
ISO brightness alone changed the crown angle from approximately 28 to 19 degrees
and improved the ISO value by 2% - but what did this do to the tilt performance?
We can easily compare our optimized gem with the original. Click Make
Ref to store the tilt performance evaluation of the optimized gem. Then
enter the original pavillion and crown angles in the Gem
Parameters panel. You can drag the PlayPen window around to reveal the
original values (41 and 28) in the main BOG window, but don't Cancel at this
point. Click Raytrace again to evaluate the original
design. The plot window should now contain two traces: a black one associated
with the current gem (i.e. the original design), and a blue
one associated with the Reference (i.e. the "optimized" gem).
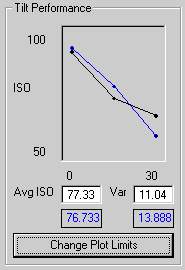 |
Note that the original design with the higher crown has better tilt performance.
Not only is the average ISO brightness somewhat higher, but also the variation
of brightness with tilt angle is less.
Clearly, there is more to optimizing a gem design than simply maximizing
face-up ISO brightness! In fact, experience has shown that tilt performance
is at least equally important in determining the impact of a gemstone
design.
In the next part of the tutorial (follow this
link), we will explicitly include tilt performance as an optimization
target.
|
In Living Colour
Before leaving the PlayPen, you should try the the Colour
Raytrace mode. Although less "scientific" than the rest of
the PlayPen and BOG, this option can be fun, and it can give at least an approximate
impression of the final appearance of a stone in real life.
Select Colour Raytrace in the Raytrace Options
panel then click the Raytrace button. Notice that
the program calls Gemray three times, and that the images change slightly. BOG
uses the Dispersion value to calculate and tell
Gemray the exact refractive index of the material for red, green, and blue light.
It then combines the three resulting Random raytraces
into a 24 bit image, which it presents against a black background in the upper
left of the window. If you look carefully at this image, you should see some
flashes of colour corresponding to regions in the stone where dispersion or
"fire" is occurring.
Back to diamonds! Click the Make Ref button then
enter the Refractive Index (2.42) and Dispersion
(0.044) for diamond in the relevant boxes (or use the Gem
Materials button). Click Raytrace to see
another reason why diamonds are so costly. For fun, try the Dispersion of Psychadelium
(0.5).
The Colour Raytrace option can also simulate the
body colour of a gemstone. The body colour was set in the "Specify Angles
and Materials" window accessible from the main BOG window. Alternatively
click the Gem Material button (next to the Refractive
Index value) to bring up the Gem Material selection window. Click on
Select Colour to see a Windows-standard colour
picker. Choose an appropriate colour then click Ok.
Back in the PlayPen, click Raytrace to see the
result. Note that the colour image includes both body colour and fire.
Please note that this is only an approximation of how light and colour play
in a real stone, but it can be fun and useful:
|
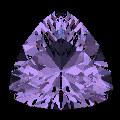
BOG PlayPen rendering of the "Trouble" (with Tribbles) gem
design.
|
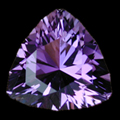
A 15 mm, 8 carat Amethyst cut in the "Trouble" design.
|
What's Next?
We have learned that additional factors besides face-up ISO brightness can
affect the performance of a gemstone design. Follow this
link to the next part of the BOG tutorial, in which we explicitly include
tilt performance in the optimization procedure.
Back to Main Page.
Documentation maintained by Tom Herbst. Last modified
17-Sep-2002